Pay in installments of $6.21 with
![]() ,
,
![]() and
and
![]()
Shipping Estimate
USA
- USA
- CAN
- USA
- CAN
Ships within 48 hours · Estimated delivery Jul 2 - Jul 7
For Your Every Summer RSVP, with Code: SUMMER15
Description
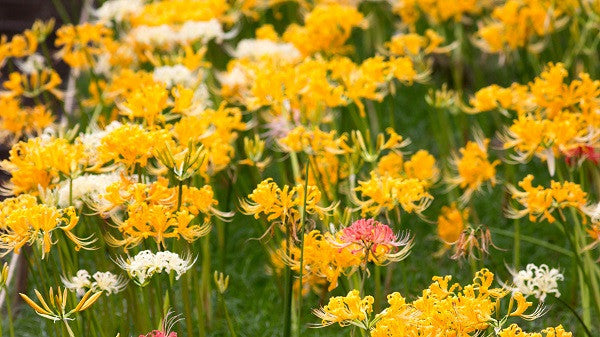
yellow spider lily bulbs for sale Yellow Spider Lily (Lycoris aurea)The yellow spider lily or "golden" spider lily is a beauty that glows in the garden with a yellow gold like color. They are often referred to as hurricane lilies because the soaking rains of a hurricane trigger their blooms to emerge about a week after the storm. Softball sized flowers stand atop sturdy 18 24'' stalks. This bulb is for warmer zones and climates (zones 8b 10), but it survives well in our Zone 8 garden by the house in Tyler, TX. In
The yellow spider lily or "golden" spider lily is a beauty that glows in the garden with a yellow-gold-like color. They are often referred to as hurricane lilies because the soaking rains of a hurricane trigger their blooms to emerge about a week after the storm. Softball-sized flowers stand atop sturdy 18-24'' stalks. This bulb is for warmer zones and climates (zones 8b-10), but it survives well in our Zone 8 garden by the house in Tyler, TX. In Houston, Mobile, Orlando, and other cities along the Gulf Coast of the United States, the fall bloom is spectacular.
How they bloom: We know that many of you already know that spider lilies bloom differently than most flowers, but we want to put this here for our new customers. Now is a perfect time to plant spider lilies. Perennial bulbs often need 6-12 months in the ground before they bloom so you are giving the spider lilies that full year in the ground before they will pop up with a bloom on a naked stalk next September/October. Yellow spider lilies usually take 1-2 years planted before presenting foliage or blooms. Your bulbs are developing a strong root system right now to support future foliage and eventually blooms. You might see the foliage this November - April, but don't be concerned if you don't.
Most people still expect to see something growing during the summer months. You won't see anything. These lilies are dormant in the summer. The flowers suddenly appear with the first later summer and early fall rains. One day there is nothing growing and then suddenly you have a surprise, a fully blooming flower! That is why they are called "Surprise lilies". Yellow spider lilies act very similarly to red spider lilies, schoolhouse lilies, and naked ladies. Simply put, they bloom in the fall and then have foliage for the winter. I have spider lilies planted almost 2 years ago that have not yet produced blooms but have produced increasing foliage each year.
Foliage: Let's talk foliage for a moment. We know that we all want to see the beautiful unusual blooms in the fall, but the foliage is very important. The foliage is what allows the bulb to grow and multiply. Many people get very concerned if they don't see the spider lily bloom the first year that they plant it and believe that maybe the bulb isn't any good. The foliage is what you watch for if you don't see your spider lily bloom, or even if you do.
The foliage of the yellow spider acts just like the red spider lily. Below you will see a picture of the foliage of the red spider lily - it looks like grass. We took the picture on November 1st. The foliage has been popping out of the ground a little over the previous couple of weeks, but now you can really see the stand. All of those different tufts of foliage are bulbs, and someday you will see a beautiful stand of red spider lilies here. In this area because of the super dry summer, not one red spider lily bloomed. However, you can see that the bulbs are growing. The foliage is up and ready to take in nutrients over the next several months while helping the bulbs grow, mature, and multiply. I know you will have to take our word for it, but there wasn't even 1/2 that much foliage there last year which shows you how quickly the bulbs multiply. The foliage will continue to grow. Even if it gets hit by a winter cold snap, it will have taken in nutrients for months! Always allow the foliage to die down naturally and don't cut it off. If you cut it, you are killing the bulb. Once the foliage is completely dead which is usually around the beginning of May, this area can be mowed. Remember, it takes a lot of energy for the bulb to push that bloom up out of the ground and open wide. The more time the bulbs can take in nutrients, the more energy they will have for that fall bloom.
Blooms: Yellow spider lilies usually need two blooming seasons before they bloom. They are large bulbs and need time to adjust. This happens often when the bulbs spend too much time out of the ground—this time out of the ground is necessary to ship them. However, once established in your garden they are there for a lifetime! Some say that the flowers bloom two weeks after the first good fall rain. If there is no rain during the month of September, the bulbs have been known to not bloom at all because they are saving their energy to protect the bulb through the dormant summer. The spider lily foliage follows the flower, staying green well through the winter and into late spring. Individual blooms aren't softball-sized but blooms together on a stalk are softball-sized.
Sun Requirements: The single most important thing about landscaping with spider lilies is the sun. They need at least 1/2 day of WINTER sun. That means about 6-8 hours of sunlight during the winter months. If you look at the photo below, you will see that they are in the shade of the trees. You can be sure that most, if not all, of those trees, will lose their leaves in the winter when the greenery needs sunlight. The spider lily puts on its foliage during the winter (November - May) and that is when it takes in the nutrients it needs to produce those golden flowers the following September. The winter foliage soaks up sun energy during winter as it prepares for summer dormancy. The foliage normally completely dies down by around May.
Plant: Don't plant the bulb too deep. You will plant the bulbs 2-3 times deep the height of the bulb (so if your bulb is 2" tall, then you will plant it 4-5 inches deep). You can plant 2-3 per hole to make the blooms look more natural. Spider lilies really do well in any type of soil. They thrive in soil that has plenty of organic material mixed in, but they do not require fertilizer. Newly planted bulbs would actually be harmed by exposure to fertilizer, so if you are going to apply nutrients, limit the application to established plants when the plants are producing their green leafy foliage during the winter. After planting the bulbs, water the soil thoroughly. Damp soil is ok, as long as the bulbs are in a spot where they will receive plenty of winter sun and the foliage is allowed to die down naturally in the spring. Standing water is not good. Once the summer season starts the spider lily will do best in soil that dries out a bit, as this facilitates its entry into the dormant stage when its leaves die back. This period is followed by its blooming season when it will reward daily watering with long-lasting blooms. Too much moisture in the soil will lead to the bulbs rotting.
Plant in a spot that receives sun in the winter. The bulbs can be in shade in the summer months as they are dormant under the ground. Add intriguing texture and new life to your fall landscape with the yellow spider lily mixed in with other fall blooming perennials like aster and mums. We recommend planting 4-6 bulbs per square foot for a dense display.
We love how the yellow spider lily behaves so differently from most flowers. It reminds us that every flower is unique. Normally, when you plant something, you expect to see it begin to grow within a few weeks with little shoots coming out of the ground. The yellow spider lily, like the red one, shows no signs of growth during the summer, but in the fall, after the first heavy rains, it will burst out of the ground on a naked stalk. Once the flower dies back, the foliage appears and stays green well through the winter and into late spring. The green foliage provides a lovely accent to your Narcissus that bloom from February-April.
Animals and yellow spider lilies:
Pollinators adore yellow spider lilies...hummingbirds, bees, and butterfilies.
Are Spider Lilies deer resistant?
While deer will eat anything (including plastic flowers if hungry enough), spider lilies are more resistant to their urges than many other ornamental garden products. They definitely leave the foliage alone during the winter, but can be attracted to the bright flowers. So the answer to this question, is that they are mostly resistant, depending on how hungry the deer are. Remember, humans ate tulips during times of hunger/famine, yet tulips definitely aren’t on our menu either.
Shipping Notes
- Free Standard Shipping on $100+ Orders to the USA.
- Except Preorder products are shipped in 48 hours.
- Delivery to the USA:
- Standard Shipping : 3-10 business days
- If time is of the essence, please consider selecting expedited delivery for faster service.
Exchange/Return Notes
- We offer a 30-day return/exchange service after receiving.
- Final sale items are not eligible for returns or exchanges.
- To process your return/exchange, please contact us at [email protected]
- Please click here for more details>>> Return & Exchange Policy